Nocto - Part One - Nvidia Jetson Nano with Yocto
Description for this Post
I am pretty much attempting to create a GUI-based application that utilizes the image I made with Yocto. It will not be perfect, but I am shooting for performance here since we have little room for mistakes and overuse and the Jetson Nano I have [¹] cannot really handle any GUI applications efficiently.
Yocto
Yocto is an open-source project that provides programmers with the ability to create Linux systems with ease. You can create very bare-bones and even base-line GUI systems all with one toolset, Yocto. Yocto also uses a build system called BitBake. Bitbake allows shell and Python tasks to be run in parallel. It has some similarities to GNU, but there are some noticeable differences, according to the documentation:
- BitBake executes tasks according to the provided metadata that builds up the tasks.
- Metadata is stored in recipe (.bb) and related recipe "append" (.bbappend) files, configuration (.conf) and underlying include (.inc) files, and in class (.bbclass) files.
- The metadata provides BitBake with instructions on what tasks to run and the dependencies between those tasks.
- BitBake includes a fetcher library for obtaining source code from various places, such as local files, source control systems, or websites.
- The instructions for each unit to be built (e.g., a piece of software) are known as "recipe" files and contain all the information about the unit (dependencies, source file locations, checksums, descriptions, and so on).
- BitBake includes a client/server abstraction and can be used from the command line or as a service over XML-RPC. It also has several different user interfaces.
Yocto has a similar approach to buildroot, but for now it is a bit more streamlined to setup a Yocto-based image for the Jetson Nano.
Why the Jetson Nano?
Like most gamers, we all knew about the trifecta for graphics and computing power: AMD, Intel, and Nvidia. AMD has mainly done both in regards to CPUs and GPUs, actually for quite some time now. Intel mainly makes CPUs, and Nvidia has only really competed in the GPU sphere and, for the most part, has somewhat dominated.
Now things have kind of evened out, and the new playing field is the IoT, or Internet of Things, especially gearing towards "AI". Nvidia had the idea to start branching off. into modular approaches to create as much revenue as possible, but it turns out most people want just the chip and not just a plug n play solution.
That, however, is neither here nor there but just so you can kind of get a feel for what we might begin to experience in regards to performance issues, bugs, and pretty much constant failures. But hey, that's what programming is about. So let's start with a base image here.
Starting with the Jetson Nano Image, But first a word from Yocto
We are using the Jetson Nano, as it has the specified hardware we would need for a GUI, and it is quite cheap, to be honest. I got mine for about 60 euros, but I have seen people trying to sell them for 200 or even 300 euros, which seems like quite an up sell to me.
First things first, we need to set up Yocto. Yocto is such a heavy tooling system that I sometimes get the feeling it is a hype and is a bit of a waste of space on my SSD, if you know what I mean (nodejs). Based on your system, we can already go ahead and setup Yocto. Start with checking your system requirements. Here they are for quick reference:
- Ubuntu 18.04 (LTS)
- Ubuntu 20.04 (LTS)
- Ubuntu 22.04 (LTS)
- Fedora 36
- Fedora 37
- AlmaLinux 8.7
- AlmaLinux 9.1
- Debian GNU/Linux 11.x (Bullseye)
- OpenSUSE Leap 15.3
- OpenSUSE Leap 15.4
If you do not have the specified system requirements, I suggest running a Docker container or a virtual machine with the specified distribution listed above. I tried running it on a newer version of Fedora (38), and it just wouldn't allow me to do anything due to incompatibilities when doing rpm installs. If you have a workaround, it would be great if you could add it in the comments below.
After you have checked that your system requirements are solid, let's download and make a GUI image from Yocto.
First, you need to have git installed for your OS (operating system) and head over to the quick build page to download the needed host packages.
Then let's go ahead and clone Poky. I really do not understand why they named it poky, but the repo pretty much contains a good base distribution with OpenEmbedded Build System, Core, and BitBake. Pretty much everything we need to get started. It's really just a bootstrapper for our project; in another repo, I will do a custom setup instead.
#first let's cd to your git project dir
cd ~ ./projects/
#now let's make a poky project dir and cd into it
mkdir -p $(pwd)/nocto && cd nocto/
#let's git clone poky
git clone git://git.yoctoproject.org/poky

cd poky
Okay, so we have cloned our "reference distribution," and we are ready to wait for a long time just to compile. It gets a little quicker after it fetches, compiles and unpacks everything. Let's check out a stable distro. For this, we can use mickledore. mickledore is the current stable build and has a shelf life of about 1 year from now. Let's checkout mickledore:
git checkout -t origin/mickledore -b nocto-mickledore
After that we need to make sure all of our layers run on the same branch. Most layers have a prefix of "meta" then a dash and the layer name like so:
meta-tegra
But before we do that we need to configure some things.
Local.conf
Within BitBake we have a configuration [²] that is generated on each poky install so before we go ahead and do anything else, let's generate that conf. Make sure you are in your project directory and copy this command:
. oe-init-build-env
Once that is done you should get a nice output like so:
You had no conf/local.conf file. This configuration file has therefore been
created for you with some default values. You may wish to edit it to, for
example, select a different MACHINE (target hardware). See conf/local.conf
for more information as common configuration options are commented.

You had no conf/bblayers.conf file. This configuration file has therefore
been created for you with some default values. To add additional metadata
layers into your configuration please add entries to conf/bblayers.conf.

The Yocto Project has extensive documentation about OE including a reference
manual which can be found at:
    https://docs.yoctoproject.org

For more information about OpenEmbedded see their website:
    https://www.openembedded.org/

### Shell environment set up for builds. ###

You can now run 'bitbake <target>'

Common targets are:
    core-image-minimal
    core-image-full-cmdline
    core-image-sato
    core-image-weston
    meta-toolchain
    meta-ide-support

You can also run generated QEMU images with a command like 'runqemu qemux86-64'

Other commonly useful commands are:
 - 'devtool' and 'recipetool' handle common recipe tasks
 - 'bitbake-layers' handles common layer tasks
 - 'oe-pkgdata-util' handles common target package tasks
It tells us that since there was no preconfigured local.conf file, it generated one for us. This is what mine looks like, I only altered some minor things and didn't add so much.[³]
I changed the MACHINE to jetson-nano-devkit and uncommented the PACKAGE_CLASSES as I am using a machine that utilizes rpm, if you were to use a Debian then Debian and so on and so forth. Usually keeping it the same is okay.
MACHINE ?= "jetson-nano-devkit"
DISTRO_FEATURES = "x11 opengl "
TARGET_ARCH = "aarch64" #jetson uses this architecture
IMAGE_FSTYPES += "tegraflash"
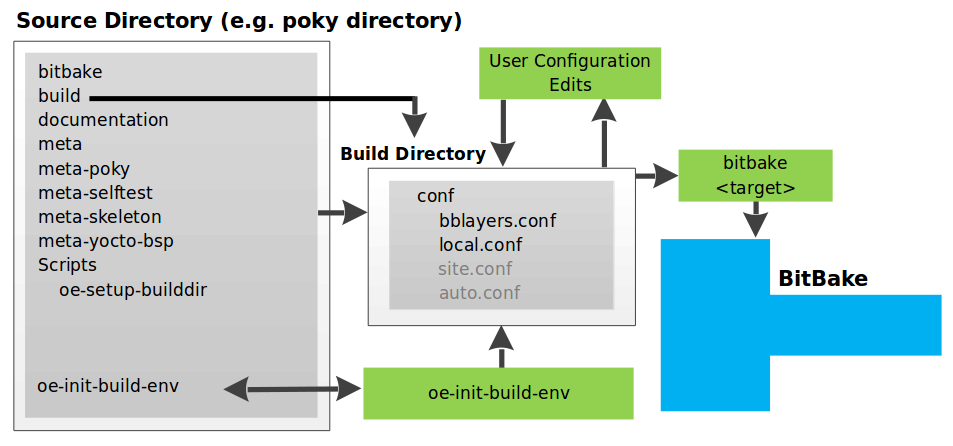
If you read over the documentation for your local configuration [⁴] you will notice some BitBake files. You can be a tad bit more controlled and focus on user configurations [⁵] but we will go over those later. These files will help target any layers we would want to include. Let's navigate to the base of the build directory and open our bblayers.conf file. Mine has some edits but yours should be somewhat similar:
POKY_BBLAYERS_CONF_VERSION = "2"

BBPATH = "${TOPDIR}"
BBFILES ?= ""

BBLAYERS ?= " \
  /your_project_root_path/poky/meta \
  /your_project_root_path/poky/meta-poky \
  /your_project_root_path/meta-yocto-bsp \
  /your_project_root_path/meta-tegra \
"
Let's now clone the meta-tegra repo:
git clone https://github.com/OE4T/meta-tegra.git /your_project_root_path/poky/
We are still missing some last bit of touches here. Each layer comes with a similar setup to poky to reduce bugs and issues. We need to cd into our meta-tegra and do a check to see if our mickledore branch is even available. Yes, you can checkout another branch but it might have some issues and cause breaking changes. Yeah I'm getting Python flashbacks too.
cd /your_meta_tegra_folder/

git branch -a
Our output should look like this and there we have it, a mickledore branch.
* master
  remotes/origin/HEAD -> origin/master
  remotes/origin/dunfell
  remotes/origin/dunfell-l4t-r32.4.3
  remotes/origin/dunfell-l4t-r32.5.0
  remotes/origin/dunfell-l4t-r32.6.1
  remotes/origin/gatesgarth
  remotes/origin/hardknott
  remotes/origin/honister
  remotes/origin/kirkstone
  remotes/origin/kirkstone-l4t-r32.7.x
  remotes/origin/langdale
  remotes/origin/master
  remotes/origin/mickledore <--- the one we want
We can run git checkout remotes/origin/mickledore and cd back out into our poky root. Now we can cd out into the poky root and we can begin to utilize our tegra layer by building poky.
BitBake will build all of the layers required to get our project up and going in no time.
Why Tegra?
Tegra comes from the name used for the SoC (System on a Chip) created by Nvidia with it's first model, the Tegra APX 2500, back in 2008. Tegra was created for mobile devices and has been replaced by their new SoC called Orin which pretty much is a powerhouse in supposed performance. Tegra is the SoC used on the Jetson Nano(2GB and 4GB). With the replacement for the Jetson Nano being the Jetson Orin at over 400 euros, I think I will stick with the older module for now. Plus our layer doesn't support the newer devices anyways. Enough with a bit of side history and let's go ahead and wait for the results.
Time to Build
It might actually take you over a day depending on your hardware and how many threads you can run with make. If you want to check on how many days you will age just run this command and times that by a thousand, kidding on the multiplication part:
nproc
My output was 16 and that took me about 8 to 10 hours to completely build our sato image. Even a core-image-minimal, which is bare bones, takes about 6 to 8 hours so not much of a difference here in time consumption (times differ based on hardware, network etc.). Since we are waiting for everything to build if you want to checkout the repo or have any questions just add them in the comments below and next we will work on flashing the SD card in the next post.
But for now just to make sure let's re run the init env and then build our image.
. oe-init-build-env

bitbake core-image-sato
Now all there is to do is to wait. There are other layers such as Qt, which is pretty popular in regards to enterprise solutions for GUIs. We could use Qt but I think building our own GUI would be a bit better as Qt is poorly built in regards to performance, cross compilation bugs and just isn't as good as others such as ImGui. But I think building our own from scratch could really help us understand the hardware we are working with a bit better. So with that, I will see you in the next post.
Post Script
Code
Everything I do in here can be seen on my github. The repo for today's post is here. As for branches, today's should be nocto-p1 which is self explanatory *.
What's next
We need to flash our image to an SD card, write the graphics engine and run some tiny tasks. There won't be any big complicated things to this implementation.
The only thing we are trying to do is to figure out how our hardware works, what are our limitations, how can we keep our peformance smooth while keeping those constraints in mind, remembering security measures and so on. We also should contemplate on ways speed up the building process which will be in a later post.
For now it's about going through the motions.